Developer Guide
- Acknowledgements
- Setting up, getting started
- Design
- Implementation
- Documentation, logging, testing, configuration, dev-ops
- Appendix A: Requirements
- Appendix B: Instructions for manual testing
-
Appendix C: Planned Enhancements
- Do checks to ensure that old data is not the same as new data when editing data.
- Make commands only take in arguments that are applicable to them and reject other extra arguments.
- Better Formatting for Contacts
- Disallow values in fields where values are not required
- Add confirmation to run destructive commands
- Add the find job applications feature
- Appendix D: Effort
Acknowledgements
- UI rendering via: JavaFX
- Testing suite via: JUnit5
-
JSON data saving and loading via: Jackson
- Jobby base UI adapted from: AddressBook Level-3
-
Autocompletion base UI adapted from: @floralvikings’s AutoCompleteTextBox.java
- New user tutorial structure inspired from: AY2324S1-CS2103T-T17-03
Setting up, getting started
Refer to the guide Setting up and getting started.
Design
.puml files used to create diagrams in this document docs/diagrams folder. Refer to the PlantUML Tutorial at se-edu/guides to learn how to create and edit diagrams.
Architecture
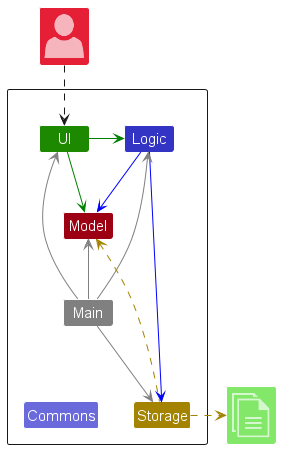
The Architecture Diagram given above explains the high-level design of the App.
Given below is a quick overview of main components and how they interact with each other.
Main components of the architecture
Main (consisting of classes Main and MainApp) is in charge of the app launch and shut down.
- At app launch, it initializes the other components in the correct sequence, and connects them up with each other.
- At shut down, it shuts down the other components and invokes cleanup methods where necessary.
The bulk of the app’s work is done by the following four components:
-
UI: The UI of the App. -
Logic: The command executor. -
Model: Holds the data of the App in memory. -
Storage: Reads data from, and writes data to, the hard disk.
Commons represents a collection of classes used by multiple other components.
How the architecture components interact with each other
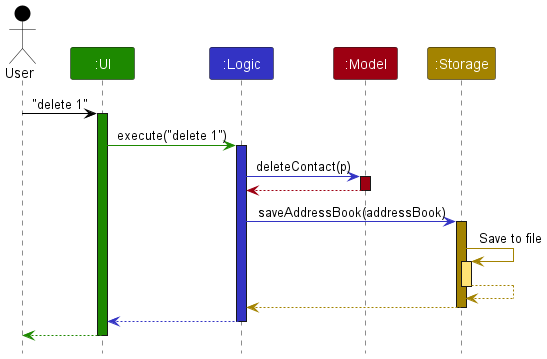
The Sequence Diagram below shows how the components interact with each other for the scenario where the user issues the command delete 1.
Each of the four main components (also shown in the diagram above),
- defines its API in an
interfacewith the same name as the Component. - implements its functionality using a concrete
{Component Name}Managerclass (which follows the corresponding APIinterfacementioned in the previous point.
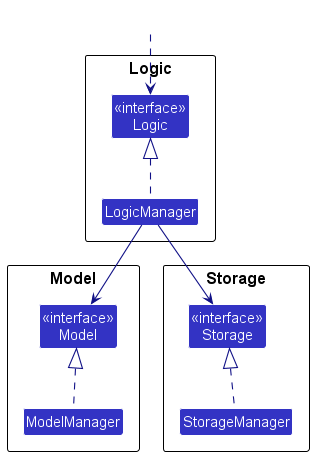
For example, the Logic component defines its API in the Logic.java interface and implements its functionality using the LogicManager.java class which follows the Logic interface. Other components interact with a given component through its interface rather than the concrete class (reason: to prevent outside component’s being coupled to the implementation of a component), as illustrated in the (partial) class diagram below.
The sections below give more details of each component.
UI component
API Reference : Ui.java
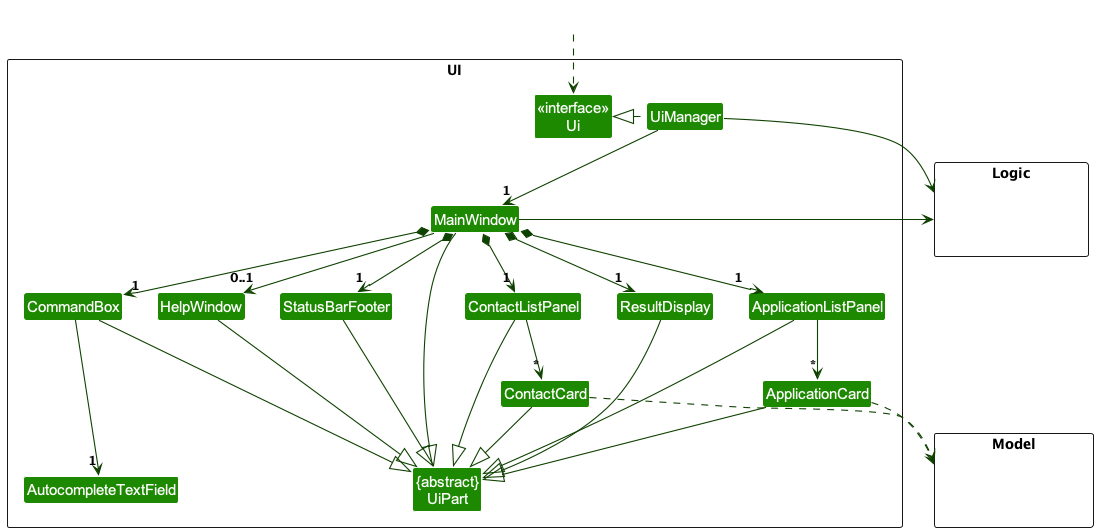
The UI consists of a MainWindow that is made up of parts e.g.CommandBox, ResultDisplay, ContactListPanel, StatusBarFooter etc. All these, including the MainWindow, inherit from the abstract UiPart class which captures the commonalities between classes that represent parts of the visible GUI.
The UI component uses the JavaFx UI framework. The layout of these UI parts are defined in matching .fxml files that are in the src/main/resources/view folder. For example, the layout of the MainWindow is specified in MainWindow.fxml
The UI component,
- executes user commands using the
Logiccomponent. - listens for changes to
Modeldata so that the UI can be updated with the modified data. - keeps a reference to the
Logiccomponent, because theUIrelies on theLogicto execute commands. - depends on some classes in the
Modelcomponent, as it displaysContactobject residing in theModel.
Logic component
API Reference : Logic.java
Here’s a (partial) class diagram of the Logic component:

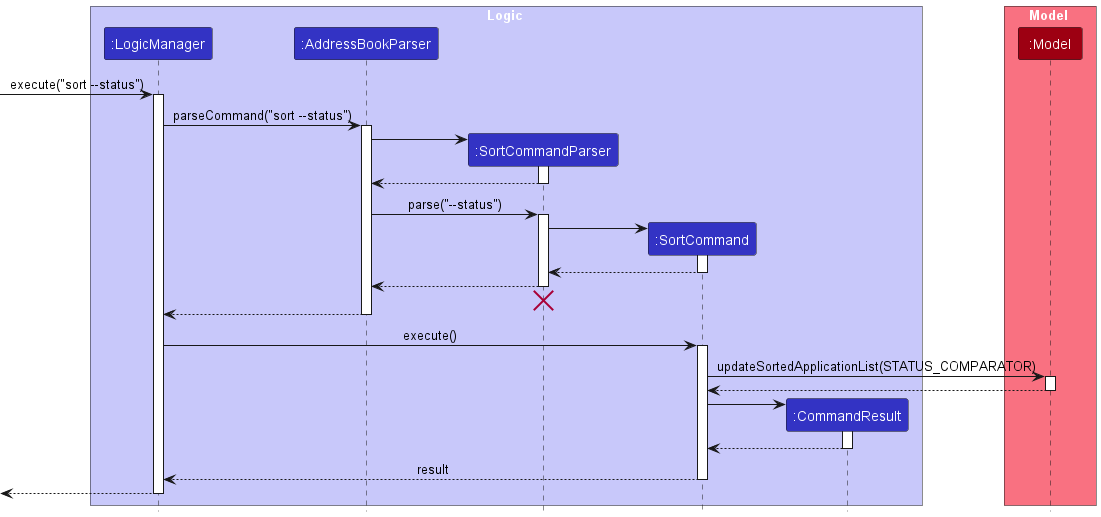
The sequence diagram below illustrates the interactions within the Logic component, taking execute("delete 1") API call as an example.
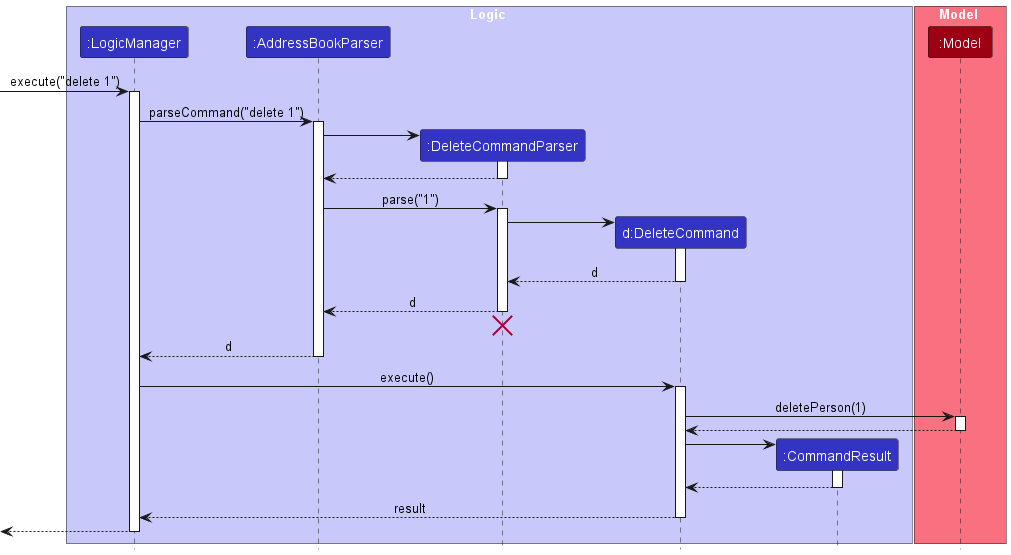
DeleteCommandParser should end at the destroy marker (X) but due to a limitation of PlantUML, the lifeline reaches the end of diagram.
How the Logic component works:
-
Executing a command:
-
When
Logicis called upon to execute a command, it is passed toAppParserwhich in turn creates a parser that matches the command (e.g.,DeleteCommandParser) and uses it to parse the command. -
This results in a
Commandobject (more precisely, an object of one of its subclasses e.g.,DeleteCommand) which is executed by theLogicManager. -
The command can communicate with the
Modelwhen it is executed (e.g. to delete a contact). -
The result of the command execution is encapsulated as a
CommandResultobject which is returned back fromLogic.
-
-
Autocompleting a command:
-
When
Logicis called upon to autocomplete a command, it is passed toAppParserwhich in turn creates an autocompletion generator capable of generate autocompletion results for this command. -
This results in an
AutocompleteGeneratorwhich is executed by theLogicManager. -
The
AutocompleteGeneratorcan communicate with theModelto obtain the current application state (e.g. to obtain the list of all contact ids) when supplying autocompletion results. -
This results in a
Stream<String>representing the possible completions, which is returned back fromLogic.
-
Here are the other classes in Logic (omitted from the class diagram above) that are used for parsing a user command for both execution and autocompletion:
Parser classes
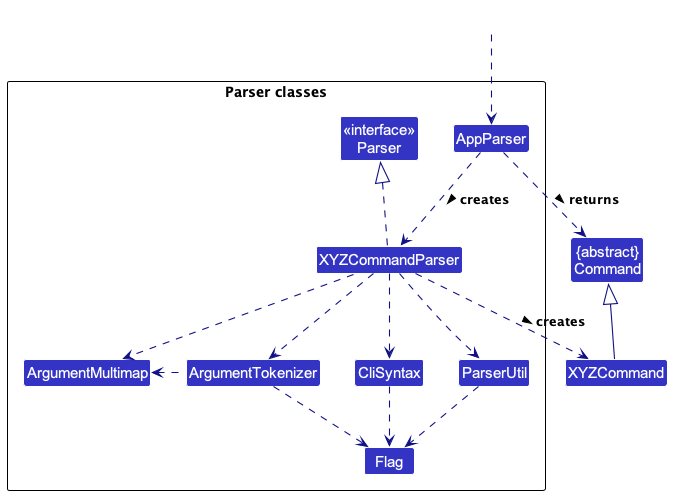
How the parsing works:
-
When called upon to parse a user command, the
AppParserclass looks up the corresponding Command Parser (e.g.,AddCommandParserif it detects an “add” command). -
There are two cases here:
-
If there exists a
Parserfor the corresponding command, it will use the other classes shown above to parse the user command and create aCommandobject (e.g.,AddCommand). -
Otherwise, it will create a
Commandobject corresponding to the command name (e.g.,AddCommand) with no arguments.
-
-
Finally,
AppParserreturns back theCommandobject.
How arguments from a raw command input may be obtained by parsers:
-
When arguments are needed for a command,
ArgumentTokenizeris used to prepare and tokenize the raw input string, which can then convert it to anArgumentMultimapfor easy access. -
An
ArgumentMultimaprepresents the command data (which has the formatname preamble text --flag1 value 1 --flag2 value 2) in their distinct fields: preamble, flags and their mapped values. Note that as a multimap, multiple values can be mapped to the same flag. -
With that, all parsers can use resulting
ArgumentMultimap(obtained from using the raw input onArgumentTokenizer) to access the required arguments to create and execute aCommand.
Design Notes:
- All Command Parser classes (e.g.,
AddCommandParser,DeleteCommandParser, …) inherit from theParserinterface so that they can be treated similarly where possible e.g, during testing.
Autocomplete classes
How autocompletion works:
-
When called upon to generate autocompletions for a partially typed command,
Logicpasses the request toAppParserclass. -
There are two cases after this happens:
-
If a command name is specified and complete (i.e., user added a space after the command name),
AppParserwill look up the correspondingAutocompleteSupplierfor the command, and create anAutocompleteGeneratorwith it. -
Otherwise,
AppParserwill create anAutocompleteGeneratorwith aSupplier<Stream<String>>that returns all possible command names.
-
-
AppParserthen returns theAutocompleteGeneratorto the requester so as they can generate autocompletion results.
For full details of the autocomplete design and implementation, refer to the Command Autocompletion Internals section.
Model component
API Reference : Model.java
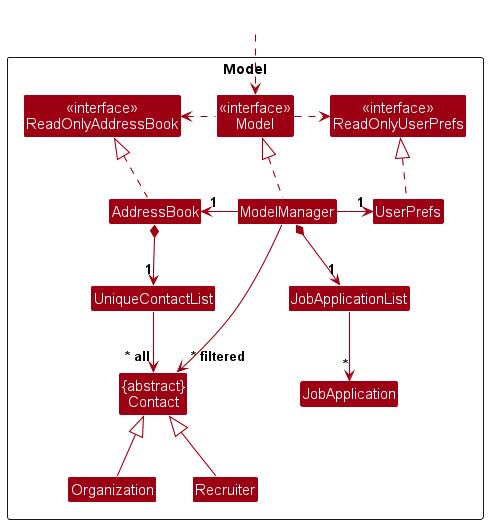
The Model component,
- stores the address book data i.e., all
Contactobjects (which are contained in aUniqueContactListobject). - stores the currently ‘selected’
Contactobjects (e.g., results of a search query) as a separate filtered list which is exposed to outsiders as an unmodifiableObservableList<Contact>that can be ‘observed’ e.g. the UI can be bound to this list so that the UI automatically updates when the data in the list change. - stores a
UserPrefobject that represents the user’s preferences. This is exposed to the outside as aReadOnlyUserPrefobjects. - does not depend on any of the other three components (as the
Modelrepresents data entities of the domain, they should make sense on their own without depending on other components)
Tag list in the AddressBook, which Contact references. This allows AddressBook to only require one Tag object per unique tag, instead of each Contact needing their own Tag objects.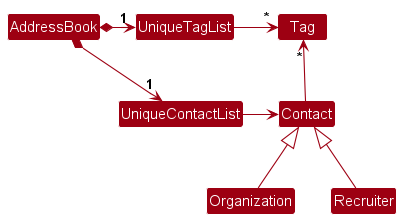
Storage component
API Reference : Storage.java
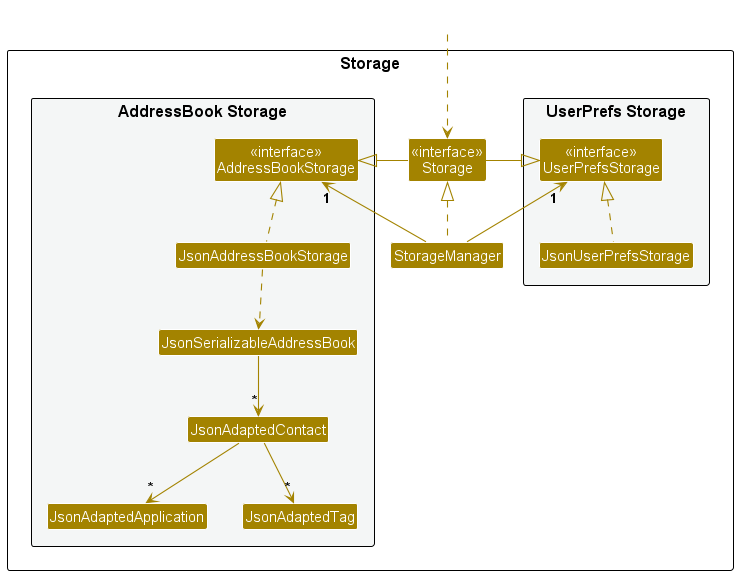
The Storage component,
- can save both address book data and user preference data in JSON format, and read them back into corresponding objects.
- inherits from both
AddressBookStorageandUserPrefStorage, which means it can be treated as either one (if only the functionality of only one is needed). - depends on some classes in the
Modelcomponent (because theStoragecomponent’s job is to save/retrieve objects that belong to theModel)
Common classes
Classes used by multiple components are in the seedu.addressbook.commons package.
Implementation
This section describes some noteworthy details on how certain features are implemented.
Command Autocompletion Internals
Overview
Jobby’s Command Autocompletion is designed to provide users with intelligent command suggestions and offer autocompletion by analyzing the existing partial command input and the current application state.
Just like programming IDEs, a user may type a prefix subsequence of a long command part, and simply press TAB to finish the command using the suggested match. For instance, type sort -tt and press TAB to finish the command as sort --title.
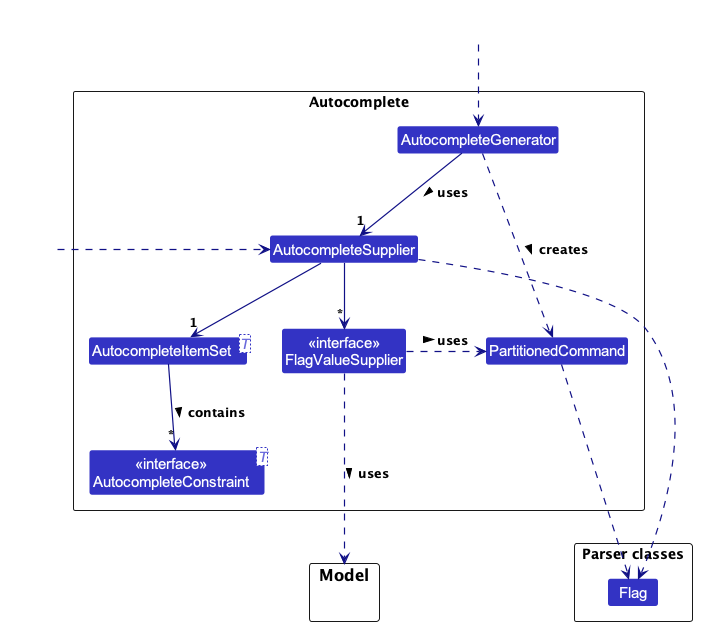
The Autocomplete Package
The full autocomplete package (and some of its dependencies) can be summarized by the following class diagram:
The implementation consists of two notable classes that will be used by high-level users:
-
AutocompleteSupplier:- This class is responsible for generating possible flags and values to be used for suggestions.
- It takes an
AutocompleteItemSet<Flag>, an optionalFlagValueSuppliermapped to each flag, and can have correspondingAutocompleteConstraint<Flag>s applied to flags. - It helps determine what flags can be added to an existing command phrase based on constraints and existing flags.
- All commands with customizable input should prepare an instance of this class to be used for autocompletion.
-
AutocompleteGenerator:- This component takes in an
AutocompleteSupplieror aSupplier<Stream<String>>and generates autocomplete results based on a partial command input and the current application model. - Users can invoke
AutocompleteGenerator#generateCompletions(command, model)to get autocomplete suggestions. - It does the hard work of taking the possible values provided by either supplier, performing subsequence fuzzy match, and then “predict” what the user is typing.
- This component takes in an
The process used to generate autocomplete suggestions with these two classes is mentioned in the high-level Logic component previously discussed.
In summary, the AutocompleteGenerator class is used to generate completions, and any command that has the ability to supply autocomplete results should have their respective AutocompleteSuppliers defined and available to be fed into the generator.
Autocompletion Constraints
Autocompletion constraints are defined via the AutocompleteConstraint<T> functional interface. It provides a way to specify rules for autocomplete suggestions.
@FunctionalInterface
public interface AutocompleteConstraint<T> {
    boolean isAllowed(T input, Set<? extends T> existingItems);
}
API Reference: AutocompleteConstraint.java
This interface can be thought of as a lambda function that takes in the input item and existing items, then returns a boolean value indicating whether the input should be allowed.
In our autocomplete implementation, we use constraints to define rules for what flags can be added to an existing set of flags. We hence use the type AutocompleteConstraint<Flag>.
Built-in Constraints
The interface offers static factory methods for quick creation of many common constraints. For example:
-
#oneAmongAllOf(items...): Enforces that at most one of the provided items must be present in the command. -
#onceForEachOf(items...): Enforces that each of the provided items can only appear once in the command. -
#where(item)#isPrerequisiteFor(dependents...): Defines dependencies between items, indicating that certain items are prerequisites before its dependents may appear.
Custom Constraints
It is possible to declare your own constraints.
Hence, to create a constraint that all flags cannot be used more than once, we can simply declare it just like so:
AutocompleteConstraint<Flag> cannotBeUsedMoreThanOnce = (input, existingItems) ->
        !existingFlags.contains(input);
Autocomplete Item Sets
An autocomplete item set - represented by the AutocompleteItemSet<T> class - is a custom set of items with an additional perk: it retains knowledge of which items have what rules and constraints.
Hence, in our autocomplete implementation, we use AutocompleteItemSet<Flag> to easily store and determine which flags can be added to an existing set of flags given the known constraints.
API Reference: AutocompleteItemSet.java
Built-in Item Set Factories
This dataset can be constructed manually with flags and constraints, but it also offers static factory methods for quick creation of flag sets with common constraints. For example:
-
#oneAmongAllOf(items...): Creates a set where at most one out of all the provided items may appear. -
#onceForEachOf(items...): Ensures that each of the provided items can appear only once. -
#anyNumberOf(items...): Creates a set with the rule that items in the set may appear any number of times.
Helper Chainable Operations
Some helper operations are provided in a chainable fashion to simplify workflows. For example:
-
#concat(sets...): Combines sets together to create complex combinations of items and their rules. -
#addDependents(items...): Establishes dependencies between items. This way, an item may require another different item to exist in order to be used. -
#addConstraints(constraints...): Adds more custom constraints as desired.
Usage Example
Suppose we have a set of flags, some supporting repeated usage (FLAG_REP_1, FLAG_REP_2), and some that may only be used once (FLAG_ONCE_1, FLAG_ONCE_2).
We can create such a set, with all the constraints automatically combined, like so:
AutocompleteItemSet<Flag> set = AutocompleteItemSet.concat(
        AutocompleteItemSet.anyNumberOf(FLAG_REP_1, FLAG_REP_2),
        AutocompleteItemSet.onceForEachOf(FLAG_ONCE_1, FLAG_ONCE_2)
);
Computing Usable Items
Finally, we need a way to compute what items are usable given existing set of items that are present. AutocompleteItemSet exposes one final method that is exactly what we need:
-
#getElementsAfterConsuming(items...): Gets the remaining set of elements after “consuming” the given ones.
Flag Value Suppliers
In some cases, Jobby should be capable of provide suggestions for flags with preset or known values, such as “--status pending”, or “--oid alex_yeoh_inc”. This is where flag value suppliers come in.
The FlagValueSupplier functional interface is a simple one that behaves like a lambda function with one task: Given a partial command for a flag and the app’s model, generate all possible values a flag may have.
@FunctionalInterface
public interface FlagValueSupplier extends
        BiFunction<PartitionedCommand, Model, Stream<String>> {

    Stream<String> apply(PartitionedCommand partialCommand, Model model);
}
API Reference: FlagValueSupplier.java
With the provided details, it is possible to specify arbitrary suppliers with any data. You can supply a preset list of completions, or even retrieve values from the model itself.
Accessing the partial command is useful if you’d like to change the results based on the heuristically detected type, such as fields that accept either an INDEX or an ID.
Note to developers: Custom FlagValueSuppliers need not actually do any prefix or subsequence matching - that is done automatically at the AutocompleteGenerator class later.
Partitioning Command Strings
The PartitionedCommand class is a simple class for quick access for a command string’s constituent parts, specifically for the purposes of autocomplete. This is done simply by initializing it with a partial command string.
API Reference: PartitionedCommand.java
For example, given the partial command “add --org --name Alice --oid ama”, you will be able to extract the partitions in the following forms:
| Command Name | Middle Text | Autocompletable Text |
|---|---|---|
add |
--org --name Alice --oid |
ama |
| Leading Text | Trailing Text |
|---|---|
add --org --name Alice --oid |
ama |
There are also helper methods to detect flag strings and other properties of the command, which can be found in the API reference.
The Autocomplete Supplier
The AutocompleteSupplier leverages the capabilities of AutocompleteItemSet<Flag> and FlagValueSupplier together to form a full supplier for a single command.
API Reference: AutocompleteSupplier.java
Internally, it must be initialized with an AutocompleteItemSet<Flag> to determine what flags can be added to a command at any point in time, inclusive of all known restrictions. It is most easily done via the factory method #from.
Additionally, one may optionally assign FlagValueSuppliers into Flags by inputting Map<Flag, FlagValueSupplier>. This allows the supplier to provide suggestions for flags with preset or known values.
You may configure both AutocompleteItemSet<Flag> and Map<Flag, FlagValueSupplier> in the same constructor call, or use factory and chaining methods to create such a set - refer to publicly exposed API calls for more details.
Usage Example
Recall the example from earlier where we created an AutocompleteItemSet<Flag>? A way to create a full AutocompleteSupplier from that is as follows:
AutocompleteSupplier supplier = AutocompleteSupplier.from(set);
We can add more details on an existing supplier by using a configurator. Suppose we have a FlagValueSupplier for a status flag. This is how we can add it to the supplier:
supplier.configureValueMap(map -> map.put(FLAG_STATUS, statusFlagValueSupplier));
Obtaining Results
The supplier exposes methods to obtain the possible flags and values:
-
#getOtherPossibleFlagsAsideFromFlagsPresent(Flags...): Gets the remaining set of flags that can be added to the command, given the flags that are already present. -
#getValidValuesForFlag(Flag, PartitionedCommand, Model): Gets the possible values for a flag, given the partial command and the model.
This is used by AutocompleteGenerator to generate suggestions later.
The Autocomplete Generator
The AutocompleteGenerator is the final stage of the autocompletion generation process.
It supports generating results based on those supplied by an AutocompleteSupplier, or any arbitrary Supplier<Stream<String>>, and generates autocomplete suggestions.
Once initialized, users can simply call the #generateCompletions(command, model) method to receive suggestions from their partial command input. It’s that easy!
API Reference: AutocompleteGenerator.java
Execution Flow
Internally, whenever requested, the AutocompleteGenerator:
- obtains a command’s parts with
PartitionedCommand, - uses the
AutocompleteSupplierprovided when initialized to obtain the results based on the available parts, - automatically performs fuzzy (subsequence) matching to filter results,
- ranks them based on their relevance,
- and finally returns a stream of autocompleted commands.
Design Considerations
When designing the Autocomplete feature, important considerations include the ability to flexibly define and craft new constraints based on heuristically determined rules.
By abstracting away all operations into simple components like sets and constraints, the current carefully crafted design allows Jobby’s Command Autocompletion to provide context-aware suggestions to users, while adhering to simple constraints defined on a per command basis.
Most notably, it also allows for advanced rulesets to be specified in a human-readable fashion. Take a look at AddCommand#AUTOCOMPLETE_SUPPLIER.
Alternatives Considered
Alternative 1: Using Hardcoded Rules in Java
One obvious alternative is to simply compute the possible autocompletion results for each command in standard Java. We may achieve this by manually checking against a command string for each command type, and using existing tokenization classes like ArgumentTokenizer and ArgumentMultimap.
While this would incur less overhead in initial development time, more explicit coding is required - it is neither quick to write nor scalable to tons of commands. This is especially important as autocomplete was developed in parallel with other new features being added to Jobby, which would require constant changes to the autocomplete rules.
Alternative 2: Using a Graph-based Approach
A graph based approach, e.g., having a tree structure to define constraints and dependencies, may be more efficient than the current solution (which has to check against all known rules every single time).
However, it will consume even more development time to implement and model the rules as a graph. Since the current implementation involves one set with a list of constraints, multiple sets can be combined by simple concatenation of both the items and the constraints.
Adding Organization
Implementation
The add Organization mechanism is facilitated by AddOrganization. It extends AddContact.
These operations are parsed in the AddCommandParser class, where the user inputs e.g. add --org --name Google will be handled and saved into the JSON database and displayed in the GUI.
Given below is an example usage scenario and how the AddOrganization mechanism behaves at each step.
Step 1. The user inputs an add organization command. The AddCommandParser will check for --org flag, and parse the input as an Organization.
Step 2. This triggers the AddOrganizationCommand, where a new Organization object will be created. And it will be pased down into JsonAdaptedContact and ModelManager to be converted into JSON data and be displayed into the GUI respectively.
Step 3. When the user want decide to add more information regarding the Organization, he can use the Edit command, which will be handled by the EditCommandParser. And the added field will be passed down into into JsonAdaptedContact and ModelManager to be converted into JSON data and be displayed into the GUI respectively.
Design considerations:
Aspect: How Add Organization executes:
-
Alternative 1 (current choice): Adds the Organization with a JSON’s key ‘type’: “Organization”
- Pros: Easy to implement and flexible to implement more types.
- Cons: NIL
Recruiter-Organization link
Overview
There are two types of contacts in Jobby - Recruiter and Organization.
Each recruiter can only be linked to zero or one organization while an organization can be linked to multiple recruiters. This association can be represented via a parent-child relationship where the parent (Organization) is linked to multiple children (Recruiter).
Implementing the parent-child relationship
For the Contact class:
- In order to incorporate this relationship into the existing model, the
Contactclass was modified to accept anotherContactas its parent, accessible throughContact#getParent().
For the Recruiter class:
-
Since the
Contactclass now accepts anotherContactas its parent, theRecruitercan pass in an existingOrganizationto set it as its parent. -
The parent
Organizationcan be retrieved viaRecruiter#getOrganization()which returns an Optional that contains theOrganizationor an empty Optional if theRecruiteris not linked to any.
For the Organization class:
-
The organization does not maintain a direct list of recruiters linked to it.
-
Instead, it is retrieved via
Contact#getChildren(Model model)where each contact in the model is checked to see whether its parent matches the organization.
Given below is an example usage scenario and how a recruiter can be linked to an existing organization at each step.
Step 1. The user launches the application. Assume that the AddressBook contains a single unlinked organization that has the id alex_yeoh and no recruiters.
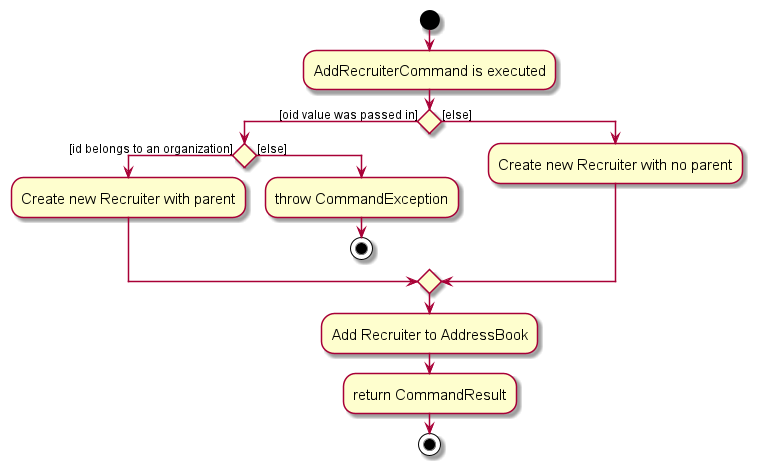
Step 2. The user executes add --rec --name Ryan --oid alex_yeoh. As the --rec flag is used, the AddCommandParser returns a AddRecruiterCommand. It also parses alex_yeoh as the id of the organization the recruiter will be linked to and passes it into the AddRecruiterCommand.
Step 3. During its execution, the AddRecruiterCommand will attempt to retrieve a Contact that has the id alex_yeoh and pass it into the new Recruiter that will be added to the AddressBook. This step can be summarized with the activity diagram below:
Step 4. Once done, the UI will add a new ContactCard to the bottom of the contacts list, displaying the details of the newly created Recruiter. The link will be displayed as a label within the ContactCard: from organization (alex_yeoh)
Editing and deleting the linked contacts
Now that the basic implementation has been discussed, the next concern is about editing and deleting the linked contacts.
As each field in the Contact is final, editing it would require creating a new editedContact and replacing the old one via AddressBook#setContact(target, editedContact).
When editing the Organization:
- As each recruiter maintains an immutable link to the object of its parent organization, editing the organization would require replacing every linked recruiter with a new recruiter that has its parent set to the edited organization.
When editing the Recruiter:
-
Since the
Organizationclass does not maintain a direct link to its children and dynamically retrieves them, editing its linked recruiter does not require any edits to itself. -
Changing the organization the recruiter is linked to would require the user to supply a value to the
--oidflag when executing theeditcommand. -
If the value matches the id of an organization within the
AddressBook, the organization retrieved viaAddressBook#getContactById(Id id)would be used in creating the new edited recruiter.
The same principle applies when deleting the linked contacts without recursion. Deleting the parent organization requires replacing every recruiter linked to it, setting their parent to null while deleting its linked recruiter requires no additional replacement.
Storing the Recruiter-Organization link
Since only the recruiter stores a direct link to its parent organization, it is sufficient to store this link in the JsonAdaptedContact of a recruiter.
As the id field can uniquely identify the organization, an additional oid field is added to the JsonAdaptedContact which records the id of the parent organization.
Since the organization has to be added to the AddressBook before any recruiters can be linked to it, the data is sorted which places any organization at the front of the list, followed by the recruiters. This is performed before writing and after reading from the json data file.
Design Considerations
Aspect: How Recruiter and Organization are being linked
-
Alternative 1 (current choice):
Recruitermaintains a direct link toOrganizationwhileOrganizationdynamically retrieves a list of its linkedRecruitercontacts.- Pros: Adheres to AB3’s immutability of contacts.
- Cons: Expensive to always comb through the
AddressBookto retrieve all linkedRecruitercontacts.
-
Alternative 2:
Organizationmaintains a list of linkedRecruitersthat can be changed via setter methods.- Pros: Computationally less expensive and easier to deal with.
- Cons: Since AB3’s design was implemented with immutability in mind, making part of
Organizationmutable might cause unwanted bugs or mistakes in other parts of the application. Additionally, overhauling the classes to be mutable would incur huge cost in development time.
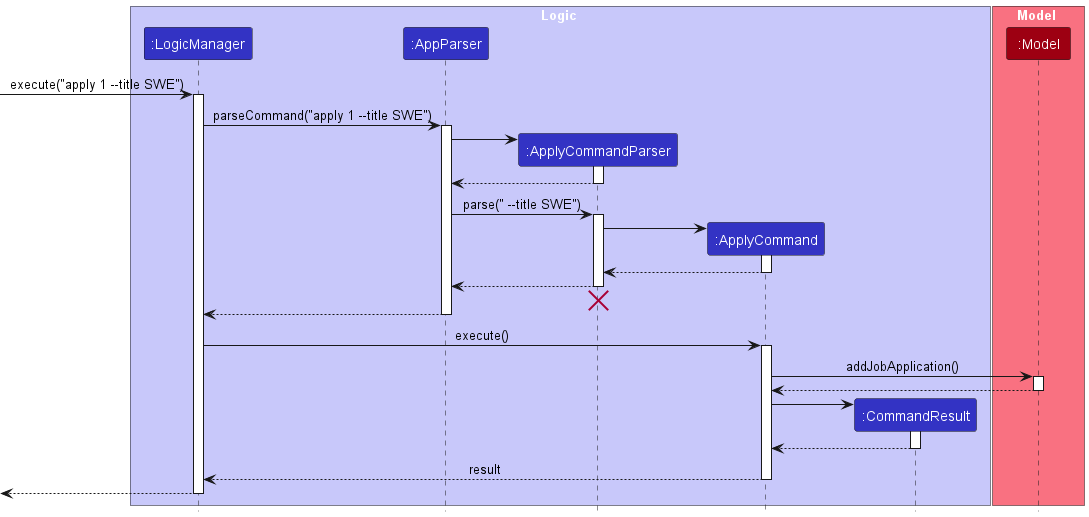
Apply feature
The apply feature makes use of existing structures to function, notably the Parser, Model and Storage
The following sequence diagram shows how job applications are added to Jobby.
Design Considerations
Aspect: How to store applications
-
Actual: Applications are stored as a JSON array belonging to their respective organizations
- Pros: Easy to implement
- Cons: Need to initialise a list of job applications from every organization every time on startup.
-
Alternative 1: Applications are stored as a JSON array separate from the contacts
- Pros: Applications can be loaded immediately into Jobby without waiting for organizations to be initialised.
- Cons: Can have complications on other features, such as identifying which applications belong to which organizations.
Aspect: How to show applications
-
Actual: Applications are shown on a separate list
- Pros: Easy to implement, less command needed to switch view from split view.
- Cons: Requires syncing the list with organizations, since there is no guarantee that the applications in the UI list are the same as all the ones in organizations.
-
Alternative 1: Use a command to switch list view
- Pros: More compact, does not require larger screen size.
- Cons: More difficult to implement, requires a command that directly changes the UI.
Aspect: What should the command syntax be
-
Actual: Use a separate command for adding applications
- Pros: Easier to type out the command, does not require a lot of typing.
- Cons: More implementation effort, to implement a new command with new parser.
-
Alternative 1: Reuse add command
- Pros: Easier to implement, can make use of existing structures surrounding the add command.
- Cons: Overloading the add command too much.
Sort feature
The apply feature makes use of existing structures to function, notably the Parser, Model and Storage
The following sequence diagram shows how Jobby sorts contacts or job applications (in this example, a job application).
Design Considerations
Aspect: Sorting by multiple flags
-
Actual: Sort does not support sorting by multiple flags.
- Pros: Easy to implement.
- Cons: Limited utility.
-
Alternative 1: Sort supports sorting by multiple flags.
- Pros: Sorting can be more complex, allowing for multi-level sorting, or simultaneous sorting of both contacts and job applications.
- Cons: More complex implementation. Would require a rework of the way the lists of contacts and job applications are stored.
Aspect: Sorting order
-
Actual: Each field has a default sorting order, which can be specified as ascending or descending.
- Pros: Easy to implement, clear to user what the sorting order will be.
- Cons: Little flexibility when sorting, especially when it comes to dates (sorting chronologically does not take current date into account).
-
Alternative 1: Allow the user to specify sorting conditions (such as “after certain date”).
- Pros: More utility for sorting command, allowing the user to better arrange data.
- Cons: More difficult to implement.
Documentation, logging, testing, configuration, dev-ops
Appendix A: Requirements
This section documents the requirements of Jobby. This consists of:
- The scope of the product
- The user stories and use cases that are relevant to Jobby.
- Non-functional requirements
Product scope
Target user profile:
- students looking to apply for jobs
- have a need to manage a significant number of organization and recruiter contacts and application statuses
- prefer desktop apps over other types
- can type fast
- prefers typing to mouse interactions
- is reasonably comfortable and familiar with using CLI apps
Value proposition:
Allows for comprehensive tracking of job applications and the information of companies and recruiters the user may be interested in, and manage them faster than a typical mouse/GUI driven app
User stories
Priorities: High (must have) - * * *, Medium (nice to have) - * *, Low (unlikely to have) - *
| Priority | As a(n) … | I want to … | So that I can … |
|---|---|---|---|
* * * |
new user | see usage instructions | refer to instructions when I forget how to use the app |
* * * |
user | adding a job application | keep track which organization I am applying to |
* * * |
user | delete a job application | remove job applications that I no longer need to track |
* * * |
user | add a new contact | keep track of organizations and recruiters I’m interested in |
* * * |
user | delete contacts | remove organizations and recruiters that I no longer need |
* * * |
user | edit my job application via index | be up to date with changes in the job application |
* * |
user | edit my contacts via index and id | be up to date with changes in organization and recruiter details |
* * |
user | find contacts by saved details | locate a contact without going through the entire list |
* * |
user | find job applications by details | locate a job application without going through the entire list |
* * |
user | link recruiters and job application to organizations | see where the recruiter comes from and where I am applying to |
* * |
user | sort job applications by deadlines | be able to which job application is most urgent |
* * |
user | sort job applications by last updated time | be able to see which job applications have gone cold |
* * |
user | find organizations which have no job applications | get a summary of the organizations that I should apply to |
* * |
user | tag contacts | organize my contact list for more efficient access of different categories |
* * |
efficient user | type shorter arguments and known values with auto-completion | type my command even more quickly |
* |
user | import and export contacts | share my list of contacts with my peers |
Use cases
(For all use cases below, the System is Jobby and the Actor is the user, unless specified otherwise)
Use case: UC00 - Inputting commands with autocomplete
MSS
- User inputs a command partially.
- Jobby shows a list of possible completions that matches the partial command.
- User selects a completion from the list.
- Jobby updates the user input with the selected completion.
-
User repeats from step 1 until the command is complete.
Use case ends.
Extensions
-
2a1. Jobby does not have any suggestions to list for the partial command.
Use case resumes at step 5.
-
3a. User dismisses the list of suggestions.
Use case resumes at step 5.
-
1a. User requests to undo the last completion.
-
1a1. Jobby undoes the last completion, if any.
Use case resumes at step 2.
-
Use case: UC01 - Add an application
MSS
- User requests to add an application.
- Jobby adds the application into the specified organization.
-
Jobby shows that the application has been added.
Use case ends.
Extensions
- 1a. The given application does not match to any Organization.
- 1a1. Jobby shows an error message. Use case ends.
Use case: UC02 - Delete an application
MSS
- User requests to delete an application
- Jobby deletes the application
-
Jobby shows that the application has been deleted
Use case ends.
Extensions
- 1a. The given application does not exist
- 1a1. Jobby shows an error message. Use case ends.
Use case: UC03 - Edit an application
MSS
- User requests to edit an application
- Jobby edits the applications.
-
Jobby shows that the application has been edited
Use case ends.
Extensions
- 1a. No details are given for which aspect of the application to edit.
- 1a1. Jobby shows an error message. Use case ends.
- 1b. The application does not exist.
- 1b1. Jobby shows an error message. Use case ends.
Use case: UC04 - Add a contact
MSS
- User requests to add a contact.
- Jobby adds the contact.
-
Jobby shows that the contact has been added.
Use case ends.
Extensions
- 1a. The given contact does not have a required field.
- 1a1. Jobby shows an error message. Use case ends.
Use case: UC05 - Edit a contact
MSS
- User requests to edit a contact
- Jobby edits the contact Use case ends.
Extensions
- 1a. The given request does not match with any contact.
-
1a1. Jobby shows an error message.
Use case ends.
-
Use case: UC06 - Delete a contact
MSS
- User requests to list organizations
- Jobby shows a list of organizations
- User requests to delete a specific organization in the list
-
Jobby deletes the organization
Use case ends.
Extensions
-
2a. The list is empty. Use case ends.
- 3a. The given index is invalid.
-
3a1. Jobby shows an error message.
Use case resumes at step 2.
-
- 3b. The given ID does not match to any organization.
-
3b1. Jobby shows an error message.
Use case resumes at step 2.
-
- 4a. The user has specified to delete recursively.
-
4a1. Jobby deletes all recruiter contacts associated with the recruiter (WIP)
Use case ends.
-
Use case: UC07 - List contacts
MSS
- User requests to list contacts
-
Jobby shows a list of contacts
Use case ends.
Extensions
- 1a. User requests to list organizations.
-
1a1. Jobby shows a list of organizations.
Use case ends.
-
- 1b. User requests to list recruiters.
-
1b1. Jobby shows a list of recruiters.
Use case ends.
-
- 1c. User requests to list organizations that have no applications.
-
1b1. Jobby shows a list of organizations that have no applications.
Use case ends.
-
Use case: UC08 - Find contacts
MSS
- User requests to find contacts or applications
-
Jobby shows a list of contacts or applications found
Use case ends.
Extensions
- 1a. User requests to find organizations.
-
1a1. Jobby shows a list of organizations that matches the search.
Use case ends.
-
- 1b. User requests to list recruiters.
-
1b1. Jobby shows a list of recruiters that matches the search.
Use case ends.
-
- 1c. User requests to list.
-
1c1. Jobby shows a list of application that matches the search.
Use case ends.
-
- 1d. No match found.
-
1d1. Jobby shows 0 matched result.
Use case ends.
-
Use case: UC09 - Sort data
MSS
- User requests to sort contacts.
-
Jobby shows a sorted list of contacts.
Use case ends.
Extensions
- 1a. User requests to sort job applications.
-
1a1. Jobby shows a sorted list of job applications.
Use case ends.
-
- 1b. User requests to reset sorting order.
- 1b1. Jobby resets the sorting order.
-
1b2. Jobby shows an unsorted list of contacts and an unsorted list of job applications.
Use case ends.
- 1c. User requests to sort by multiple fields.
-
1b1. Jobby shows an error message.
Use case ends.
-
Use case: UC10 - Remind about deadlines
MSS
- User requests to remind about upcoming deadlines.
-
Jobby shows a list of job applications, sorted by most urgent deadline.
Use case ends.
Extensions
- 1a. User requests to remind about non-urgent deadlines.
-
1a1. Jobby shows list of job applications, sorted by least urgent deadline.
Use case ends.
-
Non-Functional Requirements
- Should work on any mainstream OS as long as it has Java
11or above installed. - Should be able to hold up to 500 contacts (recruiters and organizations) and 1000 job applications without a noticeable sluggishness in performance for typical usage.
- A user with above average typing speed for regular English text (i.e. not code, not system admin commands) should be able to accomplish most of the tasks faster using commands than using the mouse.
- A user with familiarity with common Unix/Linux shell command syntax should find the syntax of Jobby to match their habits and easy to pick up.
- The command syntax should not conflict with something that a user could plausibly use as legitimate data input.
- This application does not automatically sync with a user’s job application, e.g. Does not sync to the user’s LinkedIn account to track job applications.
Glossary
- Mainstream OS: Windows, macOS, Linux, Unix
- Commands: A set of keywords that defines the operations the user wishes to execute.
- Arguments: A set of keywords that defines the type of data the user wishes to pass into the command line.
Appendix B: Instructions for manual testing
Given below are instructions to test the app manually.
Launch and shutdown
-
Initial launch
-
Download the jar file and copy into an empty folder
-
Double-click the jar file Expected: Shows the GUI with a set of sample contacts. The window size may not be optimum.
-
-
Saving window preferences
-
Resize the window to an optimum size. Move the window to a different location. Close the window.
-
Re-launch the app by double-clicking the jar file.
Expected: The most recent window size and location is retained.
-
Resetting to default data for Jobby
- Go to the folder where jobby.jar is located at
- Delete the data directory.
- Launch jobby.jar
Adding an organization
- Adding an organization
-
Prerequisites: None
-
Test case:
add --org --name Woogle --id woogle-1
Expected: Organization named Woogle is added to the list. -
Test case:
add --org --tag GoodPay
Expected: No organization is added. Error details shown in the status message.
-
Adding a recruiter
- Adding a recruiter not linked to any organization
-
Prerequisites: None
-
Test case:
add --rec --name Joe
Expected: Recruiter named Joe is added to the list. -
Test case:
add --rec --name
Expected: No recruiter is added. Error details shown in the status message.
-
-
Adding a recruiter linked to an organization
-
Prerequisites: Added an organization with the id
woogle-1 -
Test case:
add --rec --name Joe --oid woogle-1
Expected: Recruiter named Joe is added to the list with association to organization with id woogle-1.
-
Adding a job application
-
Adding an application associated with an organization
-
Prerequisites: The list has an organization at index 1.
-
Test case:
apply 1 --title SWE
Expected: Job applications associated with the first organization is added to the list. The stage is at resume and the status is pending with a deadline of 14 days from the current date. -
Test case:
apply 1 --status pending
Expected: No job application is added. Error details shown in the status bar.
-
Editing organization and recruiter details
- Editing organization and recruiter details
-
Prerequisite: The list has contact at index 1.
- Test case:
edit 1 --name Foogle
Expected: Shows that the name of the organization or recruiter has been changed to Foogle. - Test case
edit 1
Expected: Does not edit the organization or recruiter details. Error details shown in status bar.
-
Editing job application details
- Editing job application details
- Prerequisite: The list of job applications has at least 1 application.
- Test case:
edit --application 1 --status offered
Expected: Edits the status of the application to offered. - Test case:
edit --application 1 --by None-None-2022
Expected: Does not edit the status of the application. Error details shown in the status bar.
Deleting recruiters and organizations
- Deleting an organization.
- Prerequisite: Have an organization at index 1 with job applications and recruiters associated to it.
- Test case:
delete 1
Expected: Deletes the organization along with the job applications linked to it. Delinks the recruiters from the organization. - Test case:
delete 1 --recursive
Expected: Deletes the organization along with both the job applications and the recruiters linked to it.
- Deleting a recruiter
- Prerequisite: Have a recruiter at index 1 of the list.
- Test case:
delete 1
Expected: The first recruiter is deleted from the list. Details of the deleted contact is shown in the status message. - Test case:
delete 0
Expected: No recruiter is deleted. Error details shown in the status message.
Saving data
- Dealing with missing/corrupted data files
- Prerequisite: None.
- Test case: Delete half of a contact in the json data file.
Expected: An empty list of contacts and applications are displayed on startup. - Test case: Delete the data file in Jobby’s home folder.
Expected: The sample list of contacts and applications is displayed on startup.
- Modifying the list of contacts and job applications
- Prerequisite: Having existing contacts and applications when editing or deleting data.
- Test case: Adding a new contact/job application and closing the application.
Expected: The new contact/job application is displayed when the application starts up again. - Test case: Editing an existing contact/job application
Expected: The edits are saved and is correctly displayed when the application starts up again. - Test case: Deletes an existing contact/job application
Expected: The contact/job application is not displayed when the application starts up again.
Appendix C: Planned Enhancements
This section documents the enhancements that will be added to Jobby in the future.
Do checks to ensure that old data is not the same as new data when editing data.
Currently, Jobby sometimes allow editing of data such that the old data to be replaced with has the same contents as the new data.
For example, edit --application 1 --title SWE on a job application with title “SWE” works, even though nothing is effectively changed.
This can be done with a simple fix. The execute method for the editing of job applications is as follows:
    public CommandResult execute(Model model) throws CommandException {
        if (!editApplicationDescriptor.isAnyFieldEdited()) {
            throw new CommandException(MESSAGE_NOT_EDITED);
        }
        List<JobApplication> lastShownList = model.getDisplayedApplicationList();
        if (targetIndex.getZeroBased() >= lastShownList.size()) {
            throw new CommandException(Messages.MESSAGE_INVALID_APPLICATION_DISPLAYED_INDEX);
        }

        JobApplication jobApplication = lastShownList.get(targetIndex.getZeroBased());
        JobApplication newApplication = createApplication(jobApplication, editApplicationDescriptor);

        try {
            model.replaceApplication(targetIndex, newApplication);
        } catch (IllegalValueException e) {
            throw new CommandException(e.getMessage());
        }

        return new CommandResult(String.format(MESSAGE_EDIT_APPLICATION_SUCCESS, newApplication));
    }
We can easily add a new line to check if the all the contents of the new application is the same as the old one, and throw a CommandException if it is.
This can also be easily done for editing contacts.
Make commands only take in arguments that are applicable to them and reject other extra arguments.
Currently, some commands with multiple modes share parameters between modes.
Example: The edit command has a contact mode and job application mode. In contact mode, --name is used to edit the name of the contact. However, there is no such thing for job application mode.
Yet, edit --application 1 --name John --title SWE works as long as a valid field that is used for job application is used, and ignores the extra arguments.
This can be done with a simple fix. Every command alreadly has a list of flags that are accepted.
At the command parsing level, add additional checks against the list of flags provided by the command to ensure that every flag present in the command is applicable to the command used.

Better Formatting for Contacts
Currently, the contacts are not nicely formatted and exposes some internal but non-critical implementation details.
This is due to there not being a proper string conversion for the fields in the Contact class, especially when the fields which used to be compulsory are now optional.
In this case, it would be easy to address this problem, by using
optionalField.map(OptionalFieldClass::toString).orElse("None")
The Contact class can use the Contact.getClass().getSimpleName() method to get the type of the contact. Alternatively, it can use the getType method and use it for the class name, since the getType method matches the class name.
Disallow values in fields where values are not required
Currently, Jobby accepts values for fields which do not require values. For example, delete X --recursive works as the command parser does not check if there is a value associated to the flag, but only checks if the flag exists.
In this case, it is simple to add a checker similar to validating that only the allowed flags are present
Add confirmation to run destructive commands
Currently, Jobby does not warn users if they run a destructive command that cannot be undone, such as “clear”, “delete” and “edit”.
Users may then destroy their data by accident.
Proposed implementation
One way to implement warnings is to have the user input 2 commands for destructive commands:
- The actual command
- The confirmation command
Therefore, Jobby needs to be able to save the previous command to be able to execute it. One way is to store the command inside LogicManager and execute the command if the user enters a confirmation.
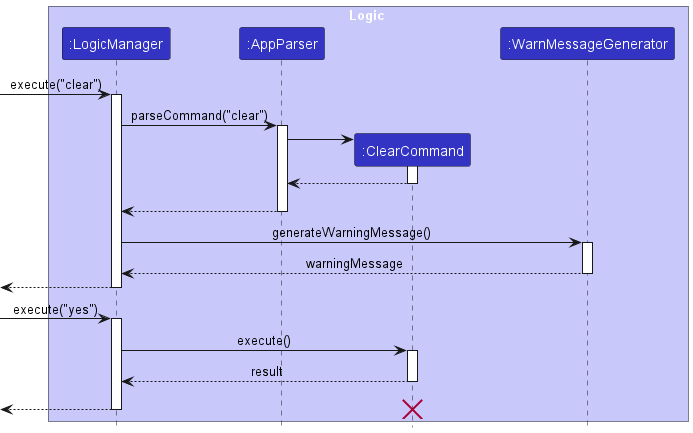
Step 1. The user executes a destructive command, such as clear to clear the data.
Step 2. The parser will check if the command is a valid command as usual, and creates the command to be executed later.
Step 3. The LogicManager checks that it is a destructive command (e.g. have commands implement a isDestructive method)
Step 4. If it is destructive, it will generate a warning message to the user, otherwise it will execute the command normally.
Step 5. The user confirms to continue with the command, which the LogicManager will execute the stored command. Otherwise, the LogicManager will not execute the command and removes the command.
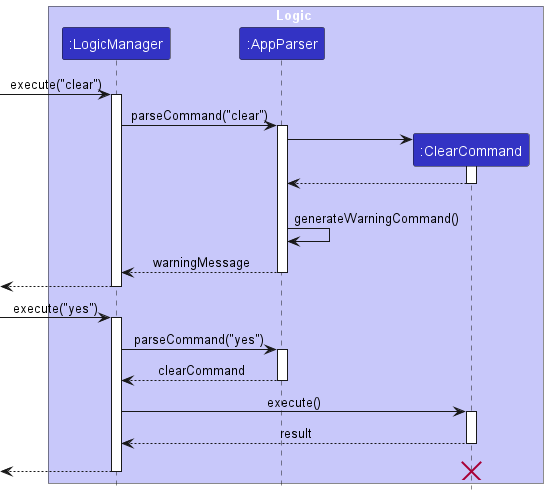
An alternative implementation from the above diagram is to allow the AppParser to store the destructive command in the AppParser instead, and when parsing the confirmation command it will give the destructive command.
Add the find job applications feature
Currently, Jobby does not implement the find function for applications.
The biggest reason is due to the complexity: The list of job applications is dependent on the list of contacts. If a job application is in the list of job applications, then the organization associated with it should also be in the list of contacts. The converse is also true. This ensures that there is no confusion when using Jobby - it would be weird to have a job application associated to a company that does not exist in the list, and even weirder to see an organization in the list but the applications made to it are not shown!
However, the find feature for applications may need to change that behavior, since the find feature will look through every job application shown and not shown in the list. Currently, the method to keep the behavior consistent would be:
- Get a list of job applications that contains the keyword.
- Filter out the list of contacts by checking if it is associated to any of the job applications from step 1.
This can be made possible by making JobApplication searchable, by providing a method to check if the keyword matches any of its fields, such as title and description.
This will allow a list of job applications that have a match to be generated, and therefore now the Model can filter the contact list based on whether the contact is associated to the job application.
Appendix D: Effort
This section documents the effort taken to evolve AB3 into Jobby.
Renaming Contact to Person
To suit the application we were creating, we renamed the original Person class to Contact.
This involved:
- Refactoring method names and parameters. (e.g
UniquePersonListtoUniqueContactList) - Refactoring existing javadocs.
- Refactoring the User Guide and Developer Guide. (including existing diagrams)
- Renaming the
personpackage tocontact.
Creating three new types of data: Organization, Recruiter and JobApplication
The Contact class was insufficient in representing the two new entities that we wanted to create for our application and we wanted to include a third to represent job applications.
This involved:
- Making
Contactan abstract class. - Create classes for the new fields (e.g.
Url,Id) - Extending existing testing infrastructure. (e.g.
OrganizationBuilderandRecruiterBuilder) - Creating and improving new test cases for these classes.
- Adding new documentation on these classes.
This was challenging as it a huge amount of time was spent modifying AB3’s existing design and overhauling the test cases.
Different command modes
As we created new types of data, each with their own set of requirements, AB3’s existing command syntax was inadaequate. We had to extend commands such as add, edit and delete to encompass this change.
For example, add can be used to add organizations (add --org) or add recruiters (add --rec).
Linking the Organization and Recruiter classes
As multiple recruiters could be associated with a single organization, we wanted to represent this relationship in Jobby.
Implementing this feature was challenging as AB3’s existing design (especially its immutability and execution process) was not suited to easily incorporate this feature.
Additionally, a huge amount of time was spent creating test cases and modifying previous test cases to include this new feature.
Autocompletion
To improve user experience, we wanted to incorporate support for command autocompletion, which allows users to know which parameters and values could be used for a certain command. This reduced the reliance on the User Guide and would help new users familiarize themselves with Jobby.
Additionally, the addition of autocompletion allows us to use full-length flags (e.g., --description), yet allowing the user to simply type -dc to obtain the full flag, removing the need to memorize multiple 1-, 2-letter abbreviations.
This involved:
- Creating multiple classes to better organize and provide autocompletion,
- Modifying the parser, tokenizer, flag syntax, etc., to aid in autocompletion, and
- Modifying JavaFX elements and intercepting the appropriate keystroke events to incorporate autocompletion.
The end-to-end process of parsing the user text and determining what are plausible inputs is not trivial - we need to correctly decide which parameters and values are suggestable values based on command rules, such as “only one of --name allowed”.
Additionally, despite the complex implementation, the autocompletion package has a comprehensive ~80% test coverage, with expected behaviors clearly documented within the tests themselves to guard against unexpected changes.
For more details, refer to the Command Autocompletion Internals.